
Preparing Your New Door For Staining
Published by Kevin on Nov 18th 2021
Staining and finishing a wood door is important for protecting it from the elements such as rain and ultraviolet light. A quality stain is what gives the wood its rich color and enhances the beauty of the grain. However, before the door is ready for stain some prep work is required. Our doors are shipped unfinished, and although they are stain grade they should not be considered completely ready for staining. The main things to address on a new unfinished wood door are minor imperfections and rough areas since the door has not been finish prepped as part of the milling stage of manufacturing.
Step 1: Inspect The door
You will want to inspect the door to identify any minor imperfections. imperfections may be small dings or scratches that occurred when handling the door, during shipping, or when they were being stored after receiving them. Note, these are not considered damages nor do they warrant replacement. Below are some examples of minor imperfections. Blemishes can also occur on new construction sites from tools, etc hitting the doors.These are easily remedied with some simple steps as part of the typical preparation for staining.
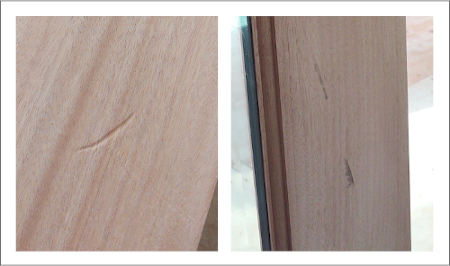
A dent or ding like this is easy to remedy with only a wet washcloth and an iron. Add a few drops of water to the dent and let it soak in. Next, soak a washcloth in water and ring it. Place the damp washcloth on the affected area. With your iron on its highest setting, place it on the damp washcloth over the affected area, and make small movements back and forth across the cloth (not touching the wood). Press down firmly and continue until the water evaporates from the cloth, At this point, the wood fibers are absorbing the water and will expand back into place. Continue this process and repeat until the dents rise up to be flush with the rest of the material. Here is a video example.
Step 2: Sand The Door
Prior to finishing, remove all debris, oils, and any other materials the unit may be exposed to during handling and installation. This is achieved by sanding the entire door with proper care by a professional to ensure no sanding marks. We recommend a 220-grit sandpaper be used along the larger flat surfaces of the door.
It is important to get a consistent feel with the wood. Wood that is rough can absorb more stain than wood that it smooth so for consistency of the finish, uniformity is important. You may also sand over and flatten any of the grains you had to steam back into place for any minor imperfections. You should not be sanding too much however. As noted, rougher areas absorb stain more and smoother areas less, so achieving a consistent feel while removing any minor imperfections is the goal.
Step 4: Clean The Door
Blow all the dust off the door. Dust the door thoroughly with a clean, lint-free cloth. If you skip this step, dust particles will become trapped in the stain, creating a muddy, uneven look.
Step 5: Prepare The Glass
Unless you removed it, the door will have plastic over the glass. This is helpful in keeping the glass from getting scratched, but not completely reliable for keeping the windows clear of stain or paint. Inspect and tape around the panels to protect the glass.
When removing any stickers or protective film it is important that you do not use a razor blade or similar utility knife or tool. This will scratch the glass.
Also note, glass will have a safety-logo in the lower corner on each piece of glass in the door. This CANNOT be removed. If you attempt to remove this, you will scratch the glass. According to the IRC, tempered glass must contain an identifying label. It states that a label must be “acid-etched, sandblasted, ceramic-fired, laser-etched, embossed, or be of a type which, once applied, cannot be removed without being destroyed.”
Staining Summary
- All exposed surfaces of the door must be sealed, including the top, side edges and the hardware cutouts. Top is highly critical as this a prime area for moisture. The bottom is pre-sealed in the factory prior to applying the sweeps.
- It is imperative and will void any warranty of the door unit if a product is used that is intended for interior use and does not contain a UV inhibitor.
- Exterior surfaces, including the top, bottom and sides of the door must be finish coated with a good quality exterior grade paint or topcoat. At least three (3) coats of exterior grade topcoat with a UV inhibitor must be applied.
- Dark opaque stains as well as dark colored paints in installations with high sun exposure will not be covered under warranty as cracking, splitting, and warping are at high risk in this application.
- Most finishes on exterior doors deteriorate due to exposure to elements. To ensure exterior doors receive the protection required, inspect the condition of exterior topcoat at least once a year and re-coat as often as needed to maintain the protective stability of the finish.
A more in-depth article on staining can be found here.